
The Photo That Makes a Thriller Dance Lead Easy to Recognize
Use a clean portrait with enough room for the shoulder hits, arm reaches and group-dance framing.
Match the source to the widest shot
Watch the widest part of the Thriller Dance AI preview. If the lead’s hands travel away from the body, use a source showing both arms and the space around them. For a closer take, a waist-up photo with the neck and shoulders still visible can be the clearer reference.
Compare the example clips before you generate
Watch the Thriller Dance examples once through, then scrub the preview to see where you would pause. Begin with the clip that frames the feature you want viewers to remember. On a second pass, compare how much space each take leaves around that feature as the subject moves. These times and dimensions describe the preview files; check the generator for current settings.
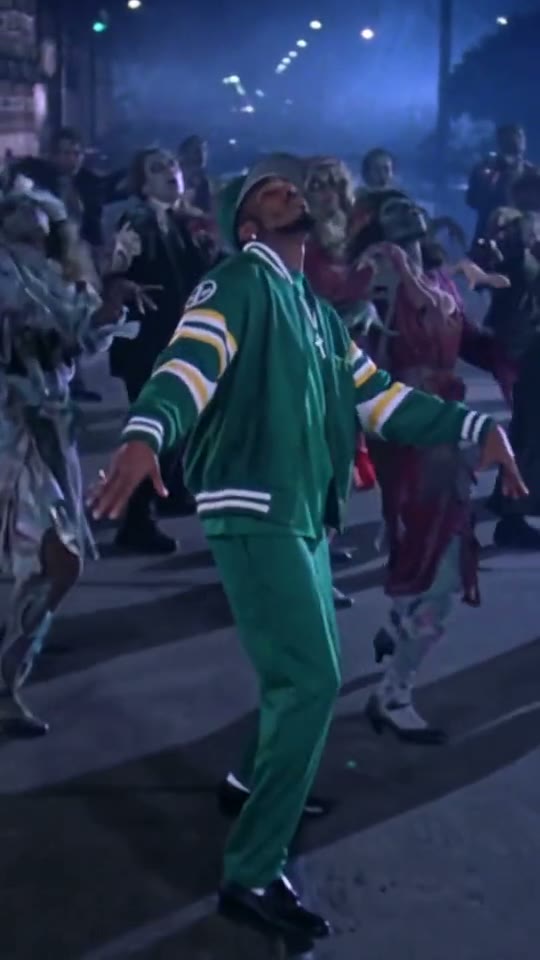
Green Tracksuit (540 × 960, 13.5 seconds)
A bright tracksuit can help distinguish the lead in the dark scene. Check whether the cuffs and hands stay separate at the widest pose. For your opening, look for the lead emerging from the crowd. Put your own source beside the preview at phone width and check the front dancer’s neckline and arm outline. If the main detail is already hard to pick out in a still, compare another source or a preview with more separation before generating.
Black Coat (540 × 960, 7 seconds)
A black coat gives you a harder silhouette test. Zoom on the shoulder edge where a backing dancer comes closest. To plan the broad arm reach in the night scene, check the frames just before and after the corresponding movement. Note which object or part of the subject first approaches the crop. Keep the last usable frame on either side as a potential trim point.
Orange Dress (540 × 960, 12 seconds)
Use the orange outfit to test whether the lead remains easy to find when the group reforms. Check a full-width still before cropping. Work backward from the moment the dancers reset. Find a frame that could serve as the cover or the start of the next shot. Check it at the intended viewing size. If the important detail disappears there, test the crop in the edit first.
Let the template bring the fog
Take the portrait in even light with one clear face. A black coat can fit the mood, but black hair, coat and background all merging into one shape makes the silhouette hard to read. Turn slightly toward a window or use a plain lighter wall. Skip the dark filter on the source.
Compare two source files at the same size
Put an original image and a wider alternative side by side. Check them at preview width first, then zoom to check blur, lighting and whether a hand, paw or piece of clothing is already missing. A file can look detailed at full size while leaving the key part of the pose unclear. Decide which file supports the movement before spending an attempt on either.
Take two test portraits in the same clothes. Use a light wall for one, and use the darker room you originally planned for the other. Zoom in at the cuffs. Pick the version where the fabric and hands have a clear boundary, then compare a still from the foggy street to see where another dancer might cross it.
For this scene, make the front dancer’s neckline and arm outline your first check. Open the file at the same width as your draft and see which part of that detail remains clear. If the sample and your source make that check difficult, try a better-lit portrait with clear cuffs and shoulders. Choose material you have permission to use for the finished audience. With two people in an edit, approve the sources separately and identify which shot introduces each person.
Prepare two crops for the night scene
- Pause the example at the widest arm reach. Sketch the space the lead occupies, including where hands move and whether anyone crosses in front. Use that frame as a guide when you choose how much of the body to show.
- Keep a waist-up reference for expression-led shots and a wider photo for a full performance. Use similar clothing and lighting if you take both, so the crop is the main difference.
- For a dark costume, find light that defines the shoulder and hair edges. Let the template create the fog and night mood. Include one visible detail, like a bright cuff, to track through the darkest shot.
- Compare both crops with the same take. Look at the arms when they extend and at the face when the group closes in. Choose the reference that passes both checks, or switch to a simpler scene.
Two short prompts to try with the selected scene
Start with the direction supplied by Green Tracksuit or the example you picked. For a revision, write what should be visible in shot order. Preserve one subject feature and one main action, then stop. Keep the same scene and source on a prompt test so the result tells you whether the new direction helped.
First pass
Place the subject in front of the group with the collar and both sleeves visible. Keep the arms clear of nearby dancers through one wide reach. Hold the group reset.
Read the brief once against the preview and decide which detail does the most work. The first look should tell the viewer who is there, and the move should read at normal speed. If your prompt introduces a second setting, a different person or an extra camera move, take that instruction out for this first pass.
One focused revision
Keep the front dancer separated from the others. Reduce the reach on the side where the sleeve overlaps another dancer.
When hands or jacket merge with the background dancers, test a better-lit portrait with clear cuffs and shoulders and keep the rest of the setup steady. Compare the same action in both takes, using stills if movement makes the difference hard to see. A working first version is also a reference for your next draft. Save its source, chosen scene and short note together.
Review the lead against the crowd
Pause with the arms extended and again when the group closes in. Watch the front dancer’s neckline and shoulder width. If the lead disappears into the crowd, choose a take where they stand farther forward or use a source with a brighter outer layer. Keep camera and pose changes separate.
If your options are a dark concert selfie and an evenly lit photo in the same outfit, start with the evenly lit one. At the arm-crossing beat, compare the sleeve edges against the background dancers and check which face the model keeps in front.
What to check at the opening, action and ending
Before the action
Use the lead emerging from the crowd to check the front dancer’s neckline and arm outline. Compare the generated frame with your source at the same viewing size. Check that the feature you care about is visible before the subject turns, the camera moves or a prop enters. If it is already missing, work on the input or framing first. A later adjustment has more to build on when the opening already looks right.
At the main beat
Around the broad arm reach in the night scene, scrub a few frames in both directions. If hands or jacket merge with the background dancers, locate the first bad frame and check whether something crosses the subject there. A problem that starts when the hand crosses the face calls for a different correction from a photo that already lacks the right profile. Test a better-lit portrait with clear cuffs and shoulders. Hold the other inputs steady and repeat the same pause on the new output.
After the move
Find the moment the dancers reset and decide whether it is a usable final frame or a cut point. Play the full clip at normal speed with the sound muted, then turn the sound back on and play it again. The first pass tells you whether the picture explains the action. The second pass lets you hear whether music or dialogue arrives early enough to make sense without masking the reply. If an action only looks awkward when stepped through frame by frame, judge it in the actual export before rebuilding the shot.
Check the quote and prepare the finished cut
Open the Thriller Dance editor, choose the actual scene and settings, and read the quote shown before submitting. You can check Pavo AI Video pricing for plan details. After submission, use the task state to find the result. Review a completed take before starting another one. If you do need another attempt, write down the one change you are testing.
Use the selected timestamp to compare the original and the new take. Open the exported file as well as the editor preview, especially if the apparent problem was at the edge of a crop. Keep the version that passes the check at the intended size and note which change improved it. That gives you a specific starting point for the next clip.
Give the exported file one last check for the front dancer’s neckline and arm outline. If the shot needs another pass, keep the exported baseline so the next change is easy to judge. For a separate worked example or a more focused workflow, read Make a Thriller Dance AI Video From a Photo.
Common questions
Should I upload a photo with Halloween makeup already on?
Use it if the costume is the identity you want and the eyes and mouth remain clear. When the makeup hides the face, take a second, cleaner reference and compare which one still looks like the intended performer in low light.
What helps when the lead gets lost in the crowd?
Choose a preview where the lead stands forward with open space at the shoulders. A contrasting coat can help, but the spacing in the reference is often the quickest thing to change.